How to Safely Remove Car Window Tint Without Damaging Your Glass

If your car’s window tint is peeling, bubbling, or no longer suits your needs, it might be time to remove it. However, removing window tint isn’t as simple as just peeling it off like a sticker. Done incorrectly, it can lead to scratches, adhesive residue, or even damage to the rear window defrost lines. With the right methods and a bit of patience, you can safely remove tint at home and restore your windows to a clean, clear state.
In Australia, where tinting is extremely popular due to the country’s harsh sun and glare, many drivers will eventually need to remove or replace window film. Whether your tint has become damaged over time or you’re preparing to apply a new, compliant film, understanding how to remove window tint properly is important. The removal process should be handled carefully to protect both your car and yourself.
Why Tint Needs Removal
There are several reasons why car owners decide to remove window tint. One of the most common is deterioration. Over time, exposure to UV rays can cause the film to fade, crack, or develop bubbles. When tint begins to peel or discolour, it not only becomes unsightly but may also reduce visibility while driving.
Legal compliance is another important factor. In Australia, vehicle tint laws vary by state, but generally, front side windows must have a minimum of 35% Visible Light Transmission (VLT). If your current tint is darker than what’s legally allowed, you could be fined or fail a roadworthy inspection. Removing old tint and reapplying a compliant film can help you avoid legal issues.
The Steam Method: Gentle and Effective
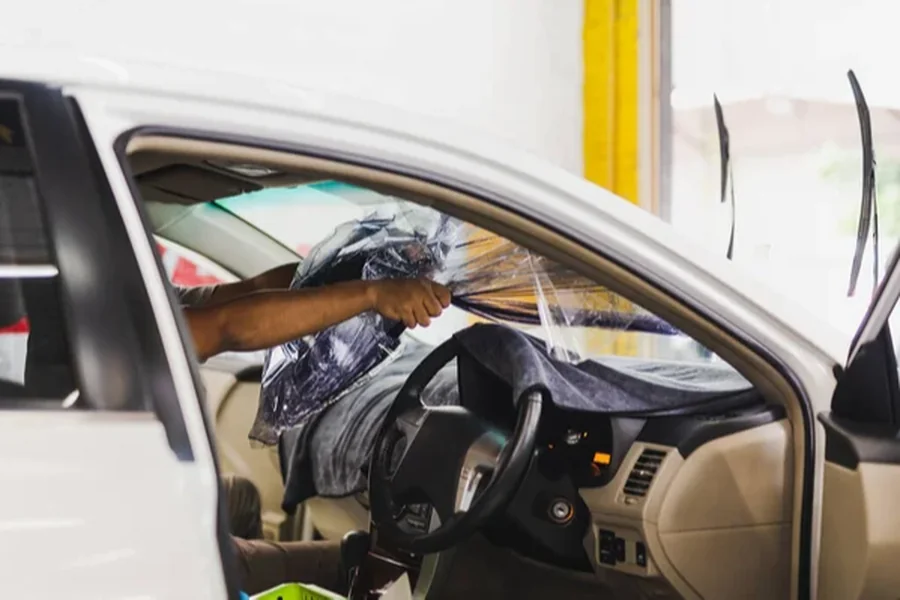
One of the most popular at-home methods for removing tint is using a handheld fabric steamer. This process is relatively simple and effective, especially if the tint film is still mostly intact. Begin by slightly lowering the window to expose the top edge of the tint. Hold the steamer close to the glass and allow the steam to penetrate the film and soften the adhesive. After about a minute or two, try to peel a corner of the tint. If it lifts easily, continue pulling gently while applying more steam to loosen the remaining sections.
As you peel, make sure you’re not rushing. If you force it, the film may tear, making removal more difficult. Once the film is off, there will likely be adhesive residue left on the window. A commercial adhesive remover or a mix of soapy water and a microfiber cloth can help clean it off completely.
The Ammonia and Sunlight Method
Another common DIY approach involves ammonia, plastic wrap, and direct sunlight. This method is particularly effective on older or more stubborn tint films. Start by spraying the interior side of the window with ammonia and quickly covering it with plastic wrap to trap the fumes. It’s best to do this on a hot, sunny day, as the heat will help activate the chemicals and soften the adhesive underneath. After letting it sit for at least an hour, remove the plastic and try peeling the film.
As with the steam method, work slowly and carefully to avoid tearing the tint or damaging the glass. It’s important to wear gloves and a face mask during this process, as ammonia fumes can be harsh and irritating.
Avoiding Common Mistakes
When removing tint, avoid using sharp tools like metal blades or knives on the glass, especially on the rear window where defrost lines are located. Damaging these lines can interfere with the window’s heating function and be costly to repair. Instead, use a plastic scraper or an old credit card to lift the edges of the film.
Don’t use harsh chemicals or excessive force, as this can damage the tint, the adhesive, or the window itself. If you’re struggling with a particularly stubborn section, apply more steam or ammonia and let it soak a bit longer before trying again.
When to Call a Professional
While many car owners successfully remove tint on their own, there are situations where professional help is a better option. If your vehicle has complex window shapes, integrated electronics, or if the tint is very old and brittle, a trained technician can complete the job quickly and safely. Professionals also have access to commercial-grade steamers and specialised tools that make the process more efficient and reduce the risk of damage.
In Australia, many automotive detailers and tint shops offer affordable removal services. If you’re planning to install new tint immediately after removal, having a professional handle both steps ensures a clean and seamless result.
Preparing for a New Tint
Once the tint is off, it’s crucial to clean the windows thoroughly. Any leftover adhesive or dirt can interfere with the application of new film. Use a residue-free glass cleaner and a lint-free cloth to ensure the surface is clear. Avoid using household glass cleaners with ammonia if you’re planning to install new tint, as they can affect how the new film adheres.
Also, take the time to review your local tinting laws. Each Australian state and territory has specific regulations regarding how dark your tint can be, especially on front windows and windscreens. Make sure your new tint complies with these rules to avoid future issues.
Final Thoughts
Removing car window tint doesn’t have to be a difficult or damaging process. With the right tools, some patience, and a careful approach, you can safely remove tint and prepare your vehicle for a fresh look. Whether you’re addressing cosmetic issues, upgrading to higher-quality film, or making your car roadworthy again, proper removal ensures a cleaner, smoother surface for whatever comes next.
Remember, if the task feels overwhelming or if your windows have additional features like defrost lines or sensors, professional removal might be the best way forward. Either way, a clean slate starts with a careful, well-informed process.